In this tutorial I will cover the basics of how I create my dapple grey horses in pastel. Later I will cover other details
like eyes, hooves, and markings.
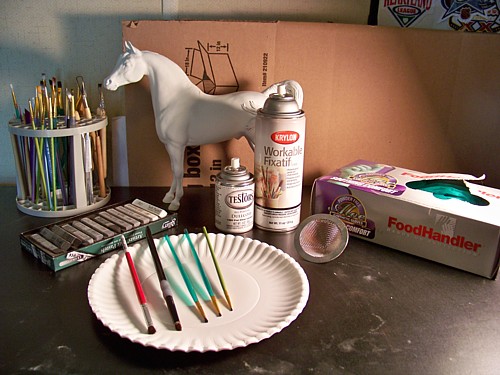
Supply List:
- Set of Greyscale Soft Pastels (not oil pastels!)
- Krylon Workable Fixatif spray
- Testors Dullcote
- Pastel grater or flat edge razor blade (get a grater it's much easier!)
- Paintbrushes - acrylic or taklon is my preferred bristle, a few round stubby or stipple brushes in varying
sizes (sometimes I'll trim some longer ones to size).
- Rubber gloves (powder free!)
- Paper plates or some other easily cleanable/disposable surface
- Make-up sponge (optional, get them cheaply at Wal-mart - not your hobby store)
All of these supplies can be found easily at your local Michael's or Hobby Lobby. Your pastel set will last you a long
time and is well worth the $10 it costs. The thing you will go through the most is spray, and as I usually am working on several
projects at a time I end up getting more on a weekly basis. Make sure you are spraying in a well ventilated area
- I usually go outside, weather allowing.
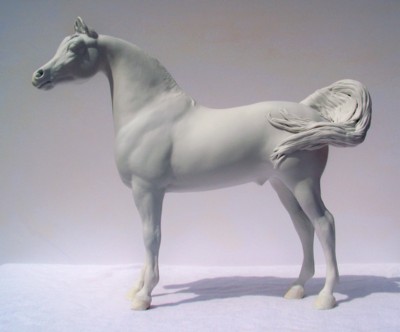
You'll need to start off with a fully prepped and primed model. A smooth primer coat is important as pastels will catch
easily on any imperfection and give you a headache later! For this project I am working on a Breyer PAS that I've customized
with a lowered head added a sculpted tail.....
Pick a spot on your horse to use as your "handle", usually I'll use a tail or a pair of legs. For this horse I will be
using his hind legs. This will end up being the last area I paint after the rest is done. Make sure you are wearing your rubber
glove (on the holding hand, I don't bother with my brush hand) at all times to avoid getting oils on the horse, pastels
love to stick to fingerprints! Also, change your gloves frequently to avoid smearing excess dust in places you don't want.
I usually change my glove after every sealer coat.
Take your Dullcote and shake well. Evenly coat your horse from all angles and let dry thoroughly. Dullcote dries pretty
quickly to a flat finish so you won't be waiting forever.
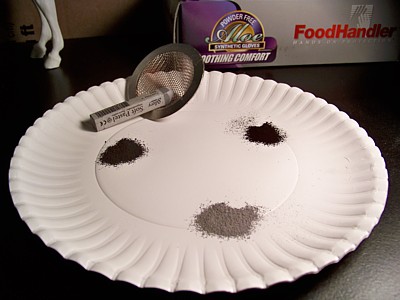
While you are waiting for that to dry, take a paper plate and in seperate corners grind out a small pile of your darkest
grey, black and medium grey. I usually make a triangle with the three piles, and at some point they'll likely end up getting
moved around. A note on pastels - they will come out much lighter than you think they will - black is dark grey at best with
a single coat.
OK - ready to get started?
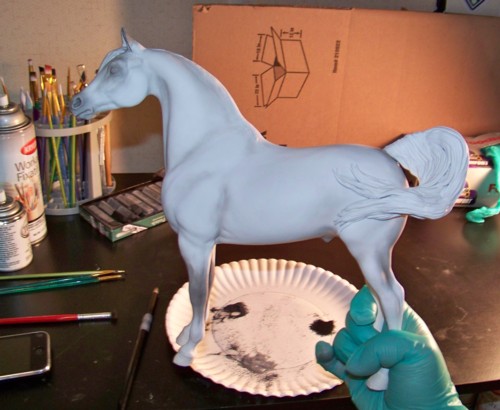
Grab your horse and one of your fat round brushes. As I am working with a traditional size horse I am going to use one
of my larger ones. Dab it in your pile of dark grey powder - your pastels will stick right to it. We're going to start with
the horses darker points first - the knees, butt, eyes and nose. Make sure to work in the pastels thoroughly, don't just brush
it - moosh it! Otherwise you'll likely end up with a grainy texture later on. After that, take your lighter grey and highlight
some of the muscular shadows.
After you're done, take your can of Fixatif (shake well first) and spray evenly over your horse to seal in the first
layer of pastels. This will leave a semi-glossy finish. Once fully dry apply another even layer of Dullcote - you'll easily
be able to see if you've missed any spots as they will still appear glossy once the Dullcote dries.
Next we will begin darkening the knees and start adding dapples. Take a small to medium round brush and dip into your black
pastels. Work in around the knees and once covered begin to work upward in an erratic circular pattern. The key thing is to
make sure your circles are not the same size, shape, or aligned right next to each other. Remember you're not acually making
the dapple you are filling in the dark spaces around the dapple. Once you have a section done of rough patterning
- go back over and keep mushing/blending in your pattern (I usually blow off the excess dust as I go) until you get a nice
soft dapple effect.
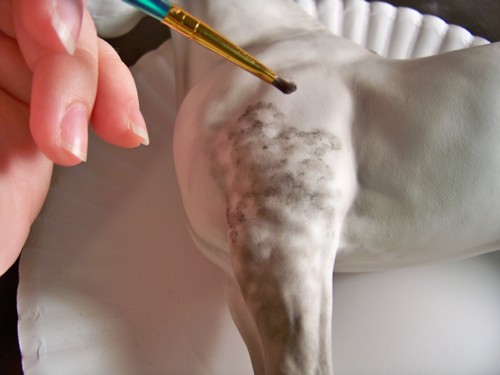
In the photo above you can see where on the top part of the leg I've just added a rough layer of black. The section between
that and the knee is the area I worked on first, and have already gone back over to soften it.
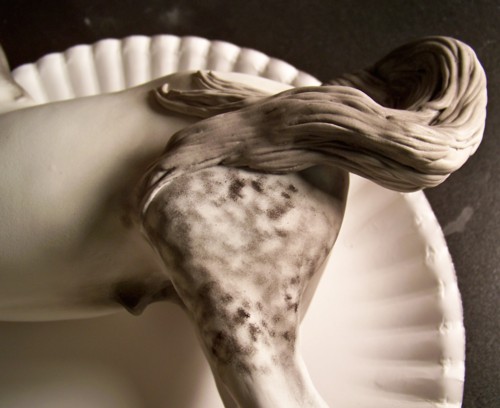
Above is another example of where I've roughly blocked in a section of the hindquarter. This area usually retains darker
dapples longer so I'll be putting some more dramatic color in. I've also blocked in his tail with black pastel at the
top, fading to light grey towards the end.

Continue working up the hindquarters blocking and blending, try not to make too large of a section at a time so you can
fix any corrections before they become a problem (A makeup sponge can help remove or blend errors). In the photo above I've
finished blending his legs and added some black pastel to define his facial area more and blocked in the crest of his mane
so I can have a better idea of where to run my dapple pattern in the next step.
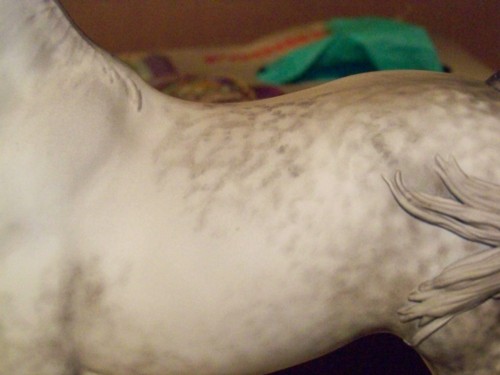
Here I've begun to work on his midsection, his barrel and underside will fade into white so I am starting with the medium
grey pastel towards the top. As my brush loses it's initial load of pastel I will move to the lower area - making light faint
dapples with what little is left in the brush. Your light grey will work well for this also. You can use a makeup sponge here
to fade your dapples at the edges of a more solid area. Above, you can see the topmost area hasn't been blended yet and the
lower area has - note how none of the dapples are in any regular size or pattern.
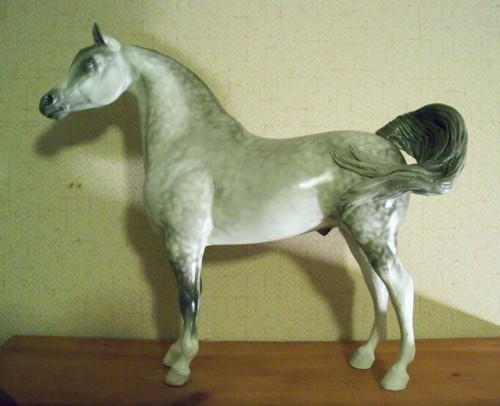
After you've finished working over the barrel and up the neck, take a look from a distance and see if any area seems
lacking for pattern - or overly patterned (depending on how dappled you want your horse). Remember, this is only your first
coat of dapples still! We will be going back to darken and further enhance the pattern! If you are satisfied, then
spray evenly with another coat of Fixatif and let dry.
Note - I have not begun on the other side yet, as you run the risk of messing up your first half by rubbing it accidentally.
Once your horse is dry, re-spray with Dullcote and repeat the process for the opposite side.
Coming soon......
Further defining and finishing your horse. :-)